“Android App Builder” Documentation by “Ahmet Zeki Eymür” v1.9
“Android App Builder”
Created: 12/20/2019
Updated: 08/08/2022
By: Ahmet Zeki Eymür
Email: azeymur@gmail.com
Thank you for purchasing my product. If you have any questions that are beyond the scope of this help file, please feel free to email via my user page contact form here. Thanks so much!
Please follow our Facebook page to be informed about news, new products and campaigns. Zeymur on Facebook
Table of Contents
- Introduction
- System Requirements
- Prerequisites
- Installation
- Settings
- Activation
- Sections
- Push Notifications
- Releasing a New Version
- Tutorial - Creating a Sample Application
- Uninstall
Introduction - top
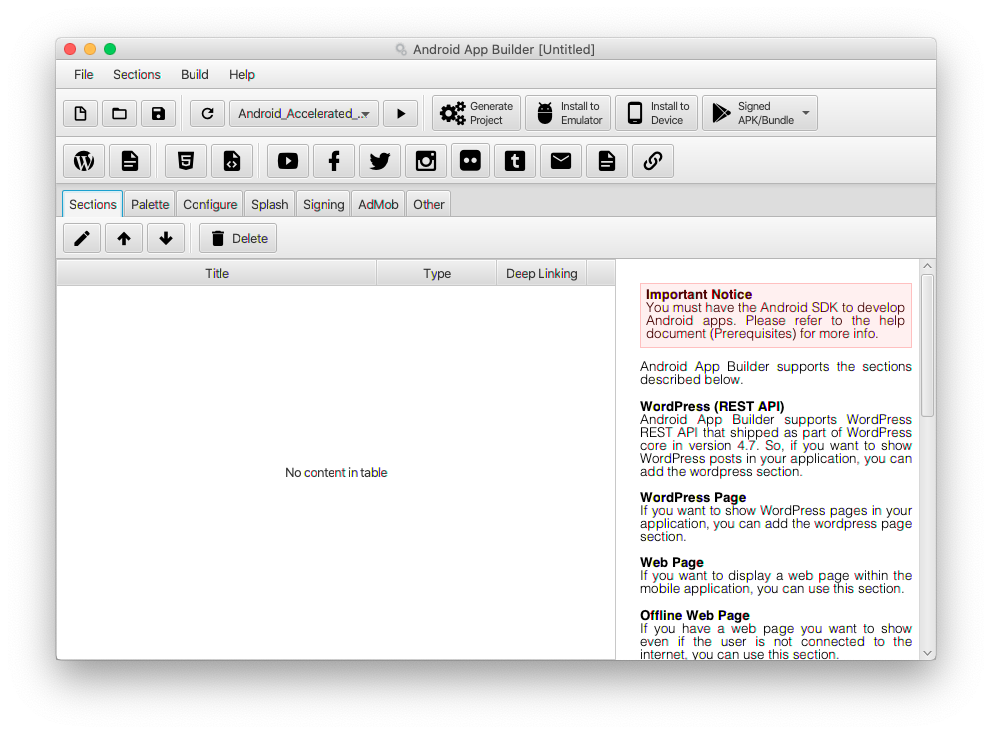
Android App Builder is a desktop application that generates native android application source code. The generated code is in the form of an Android Studio project and can be opened directly by Android Studio. So, you can customize the generated project before publishing it or you can also use it as a starter template for your new project.
Android App Builder is an easy-to-use application with graphical user interface. It contains explanations and examples on each screen.
System Requirements - top
Mac OS X- Mac OS X 10.12 or newer.
- Windows 10 (8u51 and above)
- Windows 8.x (Desktop)
- Windows 7 SP1
- Windows Vista SP2
Prerequisites - top
You must have the Android SDK to develop Android apps. You can have Android SDK by installing Android Studio from
https://developer.android.com/studio
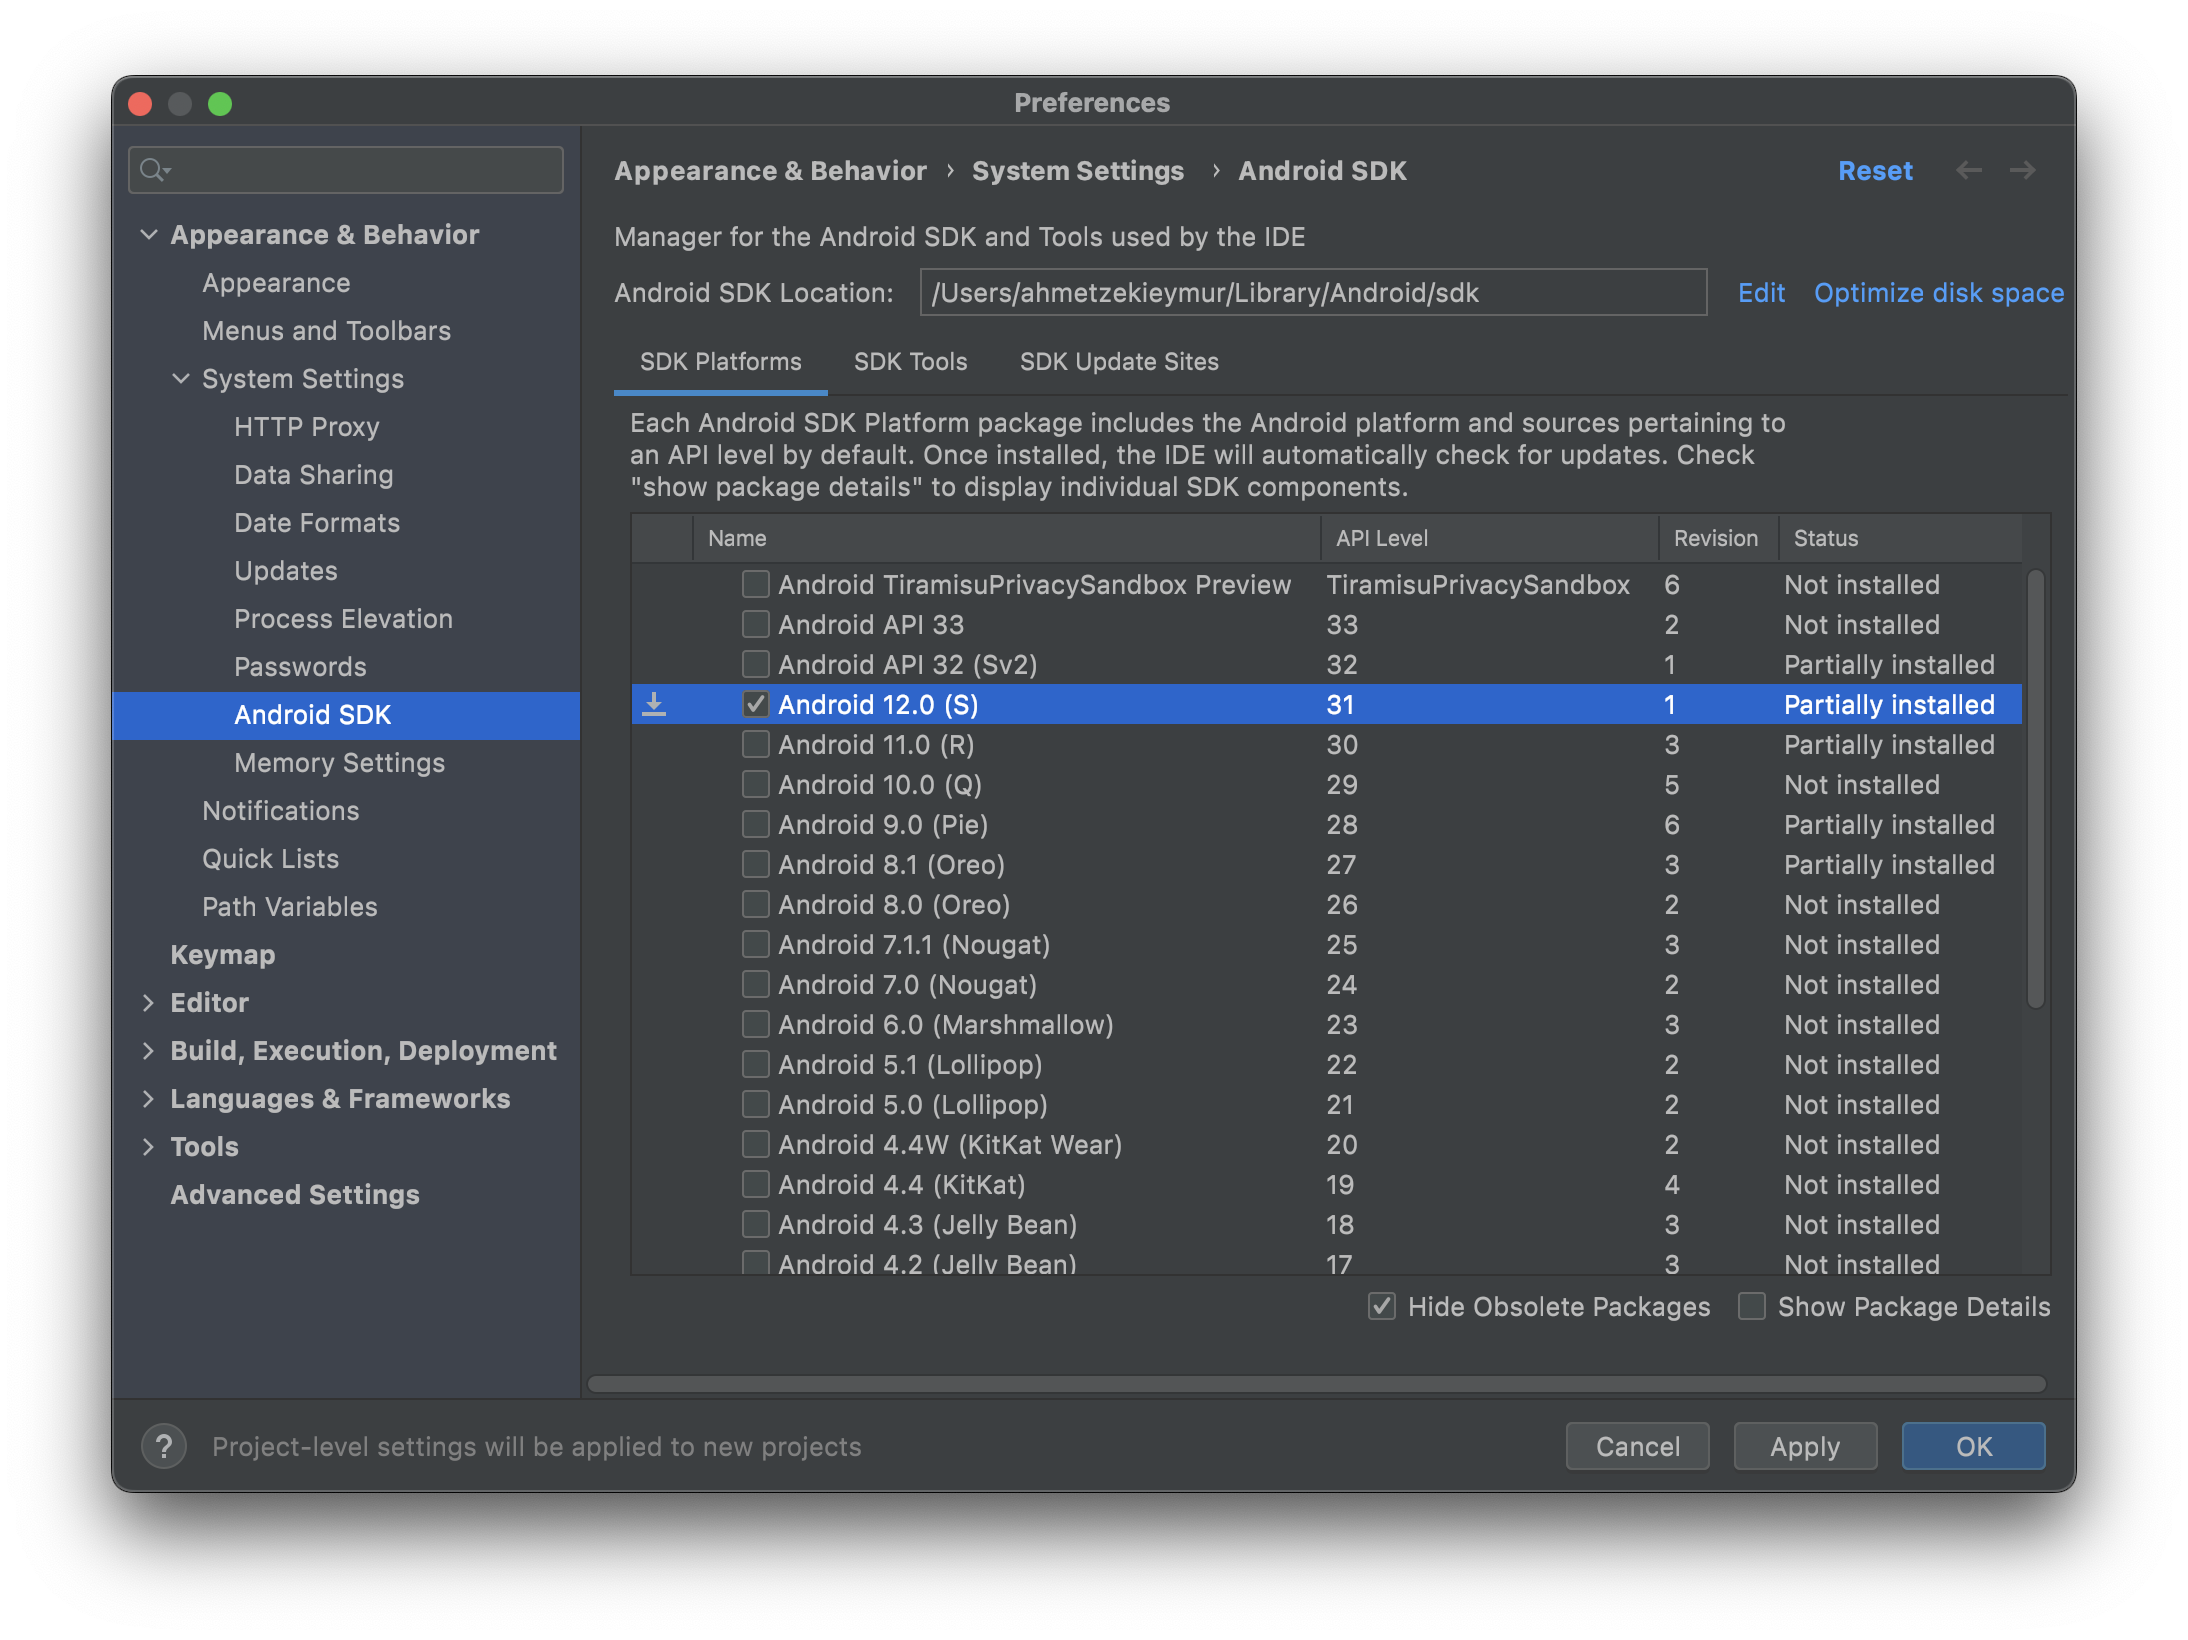
Android App Builder uses Platform SDK 31 (Android 12) and Build Tools 30.0.3 by default. You have to install them. The Android 9, 10 & 11 is for backward compatibility only. New projects should use the Android 12 SDK. Please follow the steps below:
- Launch Android Studio.
- Click configure button in bottom of welcome screen.
- Select SDK Manager from menu.
- Enable checkbox of the Android 12 (S)
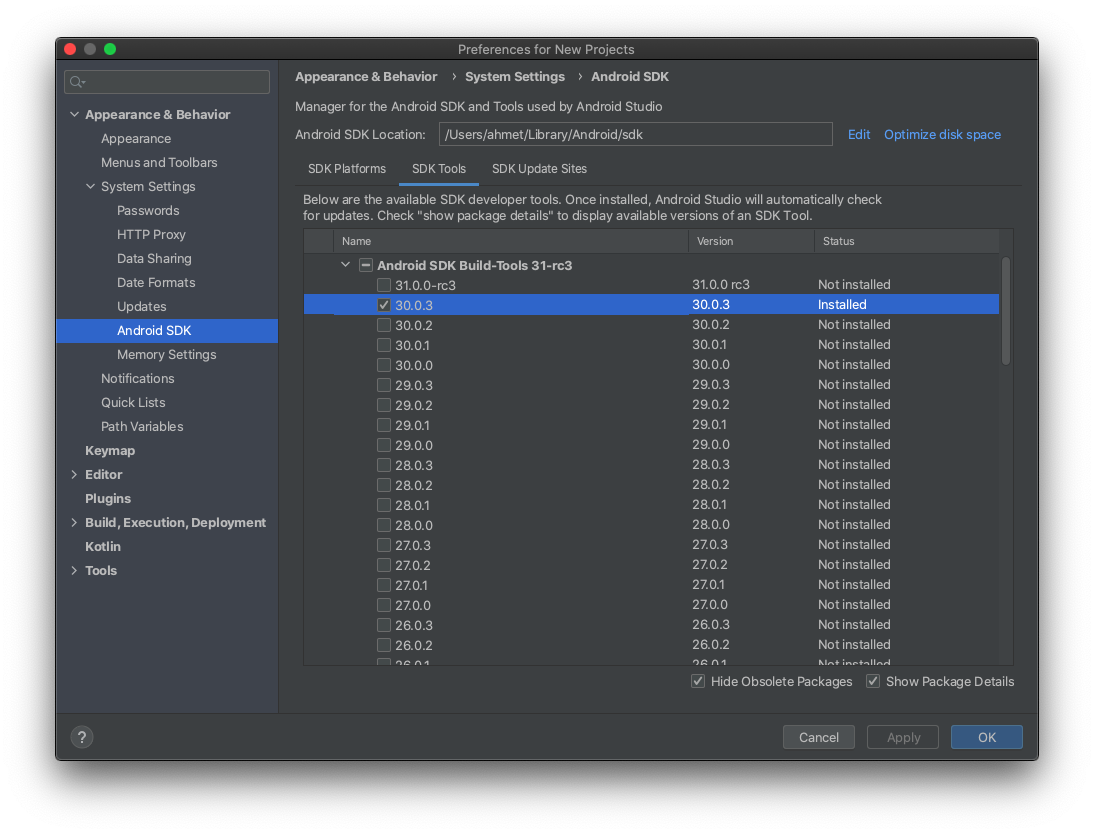
- Go to SDK Tools tab page.
- Enable checkbox of 'Show Package Details' in bottom.
- Click to small arrow of 'Android SDK Build-Tools'
- Enable checkbox of 30.0.3
- Click to OK button.
- Agree license when it needed.
If you have not an emulator yet, you may want create one for testing. This is not necessary. You can also use a real Android device for testing. Please follow the steps below, if you want to use an emulator :
- Launch Android Studio.
- Click configure button in bottom of welcome screen.
- Select AVD Manager from menu.
- Click to 'Create Virtual Device' button.
- Choose a device definition then click Next button.
- Select a system image. Download, if needed. Click Next button.
- Verify configuration and click Finish button, when you are ready.
- If Android App Builder is running, click to Refresh button from toolbar in the main window of Android App Builder.
If you want to use a real Android device for testing, you must enable USB debugging. On Android 4.2 and newer, Developer options is hidden by default. To make it available, Please follow the steps below.:
- Go to Settings
- Tap the menu item About Phone.
- Tap the 'Build Number' seven times.
- Return to the previous screen to find 'Developer Options' then enable 'USB Debugging'.
Installation - top
Mac OS XPlease mount OsxInstallerAndroidAppBuilder.dmg then drag and drop AndroidAppBuilder.app to the Applications folder.
WindowsPlease run WinSetupAndroidAppBuilder.exe and follow the instructions.
Settings - top
Android App Builder needs to know the location of Android SDK. If you have Android Studio installed with the default parameters, Android App Builder will find it itself. In this case, you do not need to do anything.
If you haven't installed Android Studio with default parameters, you have to set the location of Android SDK manually. Click on File -> Settings from the drop-down menu to go to the Settings dialog and select the location of your Android SDK.
Activation - top
After completing the installation, you need to activate the product. Please go to Help -> Activation from menu and enter your purchase code in the activation window.
Please do not share your purchase code with anyone. If your purchase code is used for activation on another computer in the future, previous activations will automatically become invalid.
If you don't know your purchase code please refer to Where is my purchase code ?
Sections - top
Sections are the most important parts of Android App Builder. A section gets and presents data from the associated content provider. It uses the parameters and settings that you provided. Android App Builder does not include any restrictions on adding section. You can add as many sections to your application as you want. It also allows you to use the same section more than once. For example, you can add as many playlists or YouTube channels as you want in your app by adding multiple YouTube sections.
To add a section, select the desired section in the main menu or you can use the buttons on the toolbar. This opens the Add new section dialog. Android App Builder supports the sections described below.
- WooCommerce
This section supports WooCommerce REST API V3. You can use the WooCommerce section, if you have a WooCommerce based web site. - WordPress (REST API)
Android App Builder supports WordPress REST API that shipped as part of WordPress core in version 4.7. So, if you want to show WordPress posts in your application, you can add a wordpress section. - WordPress Page
If you want to show WordPress pages in your application, you can add a wordpress page section. - Web Page
If you want to display a web page within the mobile application, you can use this section. - Offline Web Page
If you have a web page you want to show even if the user is not connected to the internet, you can use this section. - YouTube
You can add a YouTube section, If you want to show YouTube channel or a playlist in your mobile application. - Twitter
If you want to show tweets in your mobile application, you can add a Twitter section. - Flickr
You can add a Flickr section, If would like to show images of a Flickr album or gallery. - Tumblr
You can add a Tumblr section, If you want to show the blog of a Tumblr user in your mobile application. - Contact Form
You can add a contact form to your mobile application so that your users can contact you. The mobile app will send you the information collected from the user in the contact form via email. To do this, you must provide an email account information that an application can use. - Offline Page
You can use this section if you want to add static text to your mobile application. - Link to URL
You can use this section if you want to redirect the user to a web page using the mobile device's default web browser.
Push Notifications - top
If you want to be able to send notifications to your users, you can use OneSignal. Please go to
https://www.onesignal.com
and follow the instructions to get your app id then enter your app id to the 'OneSignal App Id' field in 'Other' tab. If you don't know what the Firebase Server Key and Firebase Sender ID are, please see this document. If you do not need to send notifications, leave 'OneSignal App ID' field empty.Installing the mobile app is not enough to receive notifications. It must have been run at least once and allowed to receive notifications when asked.
You have a few options in OneSignal dashboard for handling links within your mobile app.
- Default Action
When subscribers click your notifications, the mobile application launches by default and loads the first section. Leave the Launch URL field empty in the OneSignal dashboard for this. - Launch URL
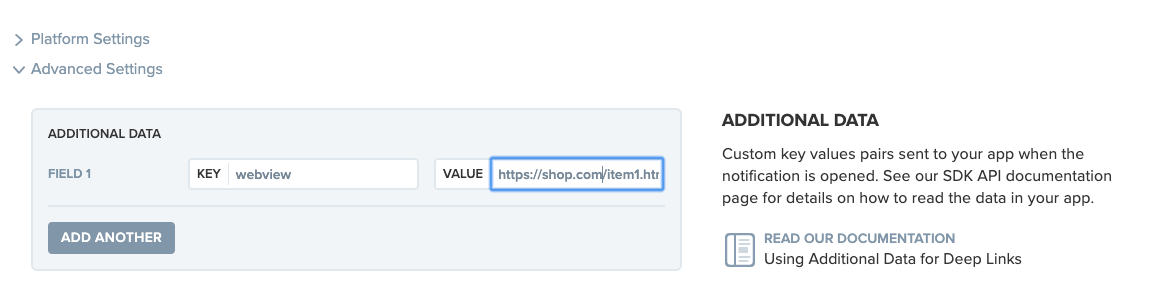
Using the "LAUNCH URL" field in the dashboard will open the provided url within default web browser in user device. - Deep Linking
Using the "ADDITIONAL DATA" field in the dashboard will open the provided url within a webview section in your mobile app when clicking the notification. To send an URL parameter with your notification, add an additional data to your notification that included the keyword "webview" and your URL. For the notification deep linking to work, you must have a webview section in your project where deep linking check box is enabled.

Releasing a New Version - top
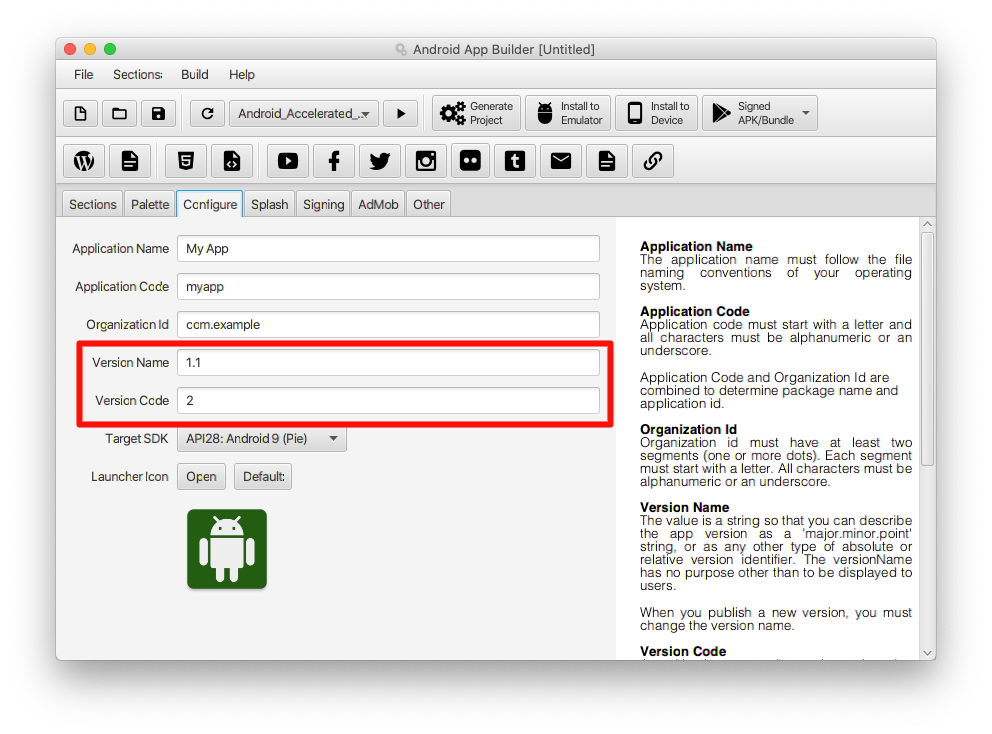
When you publish a new version, you must change the version name and version code in the configure tab. Version name is a string so that you can describe the app version as a 'major.minor.point' string, or as any other type of absolute or relative version identifier. The versionName has no purpose other than to be displayed to users.
Verison code must be a positive integer used as an internal version number. This number is used only to determine whether one version is more recent than another, with higher numbers indicating more recent versions.
Tutorial - Creating a Sample Application - top
- Click to 'Add Web Page' from Sections menu.
- Enter a text of your choice in the Title field.
- In the URL field, enter the full address of the webpage you want to view. Then click OK button.
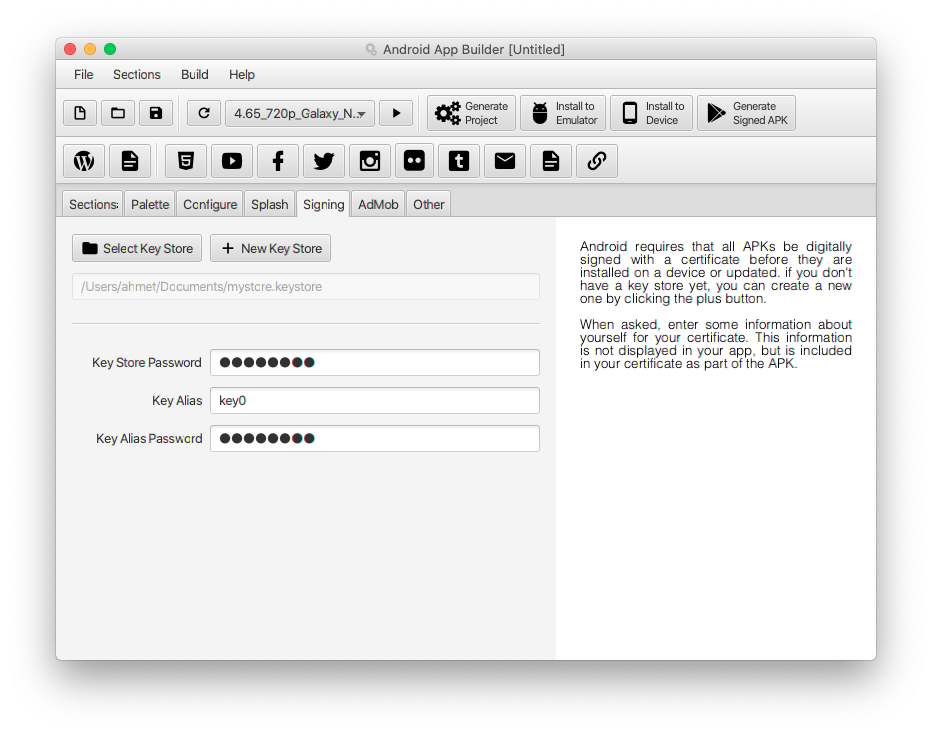
- Go to Signing tab. If you have a key store, select it and enter your passwords.
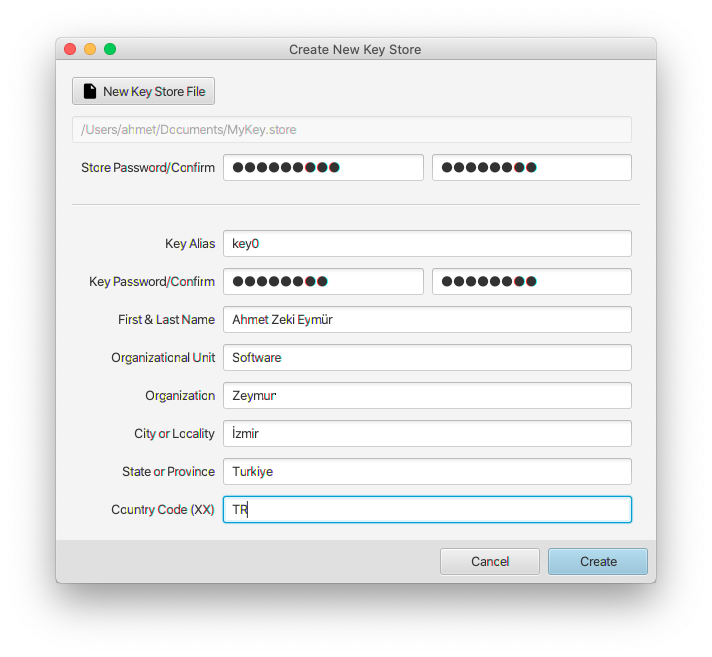
- if you don't have a key store yet, you can create a new one by clicking the 'New Key Store' button. When asked, enter some information about yourself for your certificate.
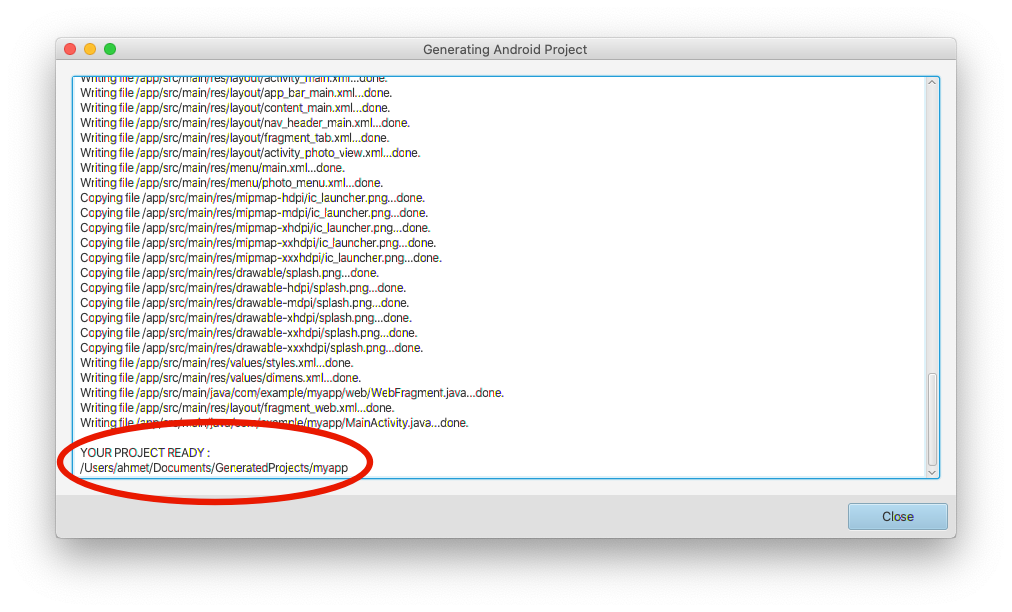
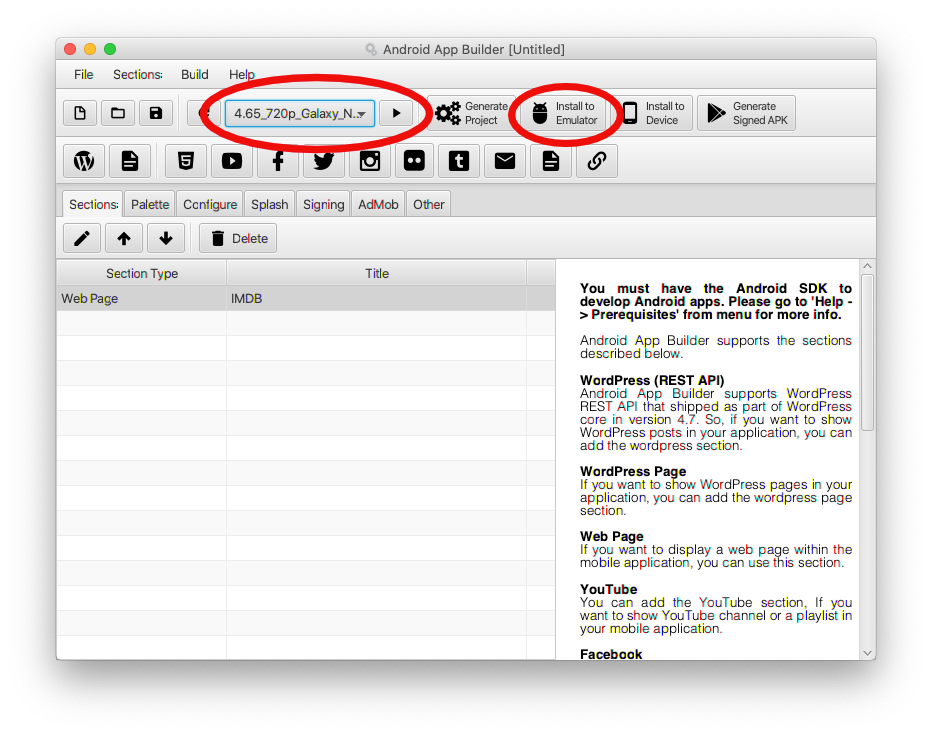
- Click to 'Generate Project' from toolbar and select a location for your Android project. Then click to 'Start' button. When your project is ready, close the 'Generate Android Project' window.
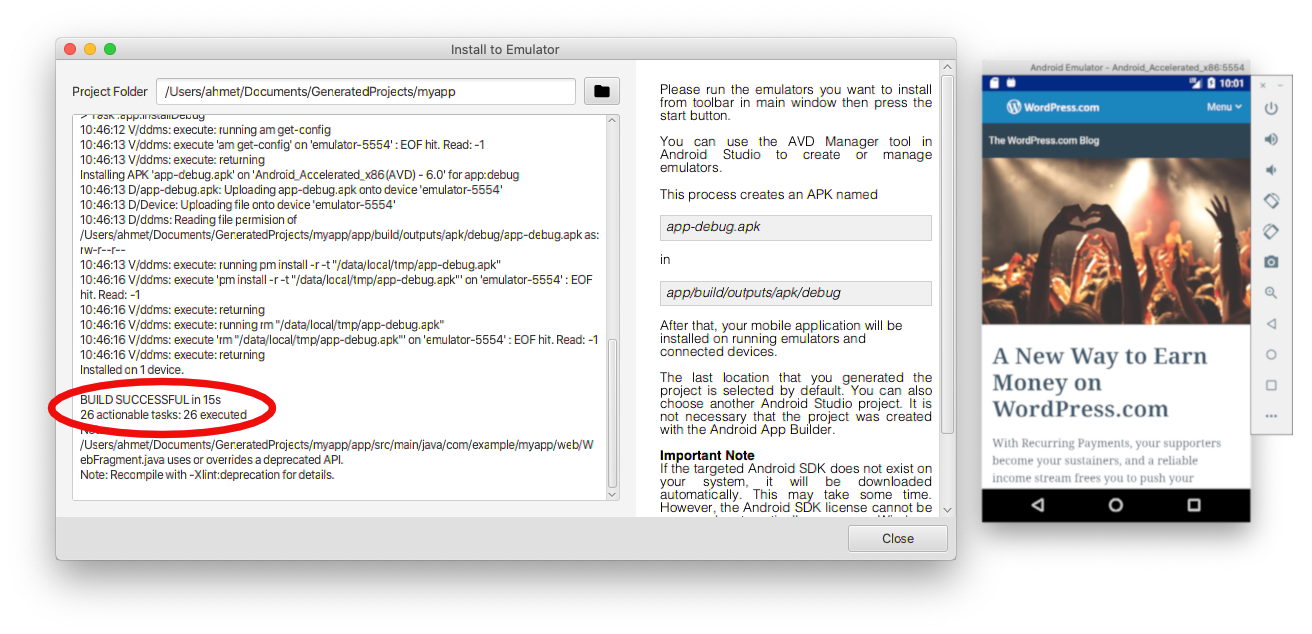
- Your project is ready for testing now. You can test it with an emulator or a real device. If you want to use the emulator, select an emulator from the list in the toolbar, and then click the 'Launch the Emulator' button next to it. When emulator is ready, click to 'Install to Emulator' button then follow the instructions in new window.
- If your build was successful, you will find the your new mobile app in Applications on your emulator.
- If you want to use a real device, click to 'Install to Device' button then follow the instructions in new window. If your build was successful, you will find the your new mobile app in Applications on your device.
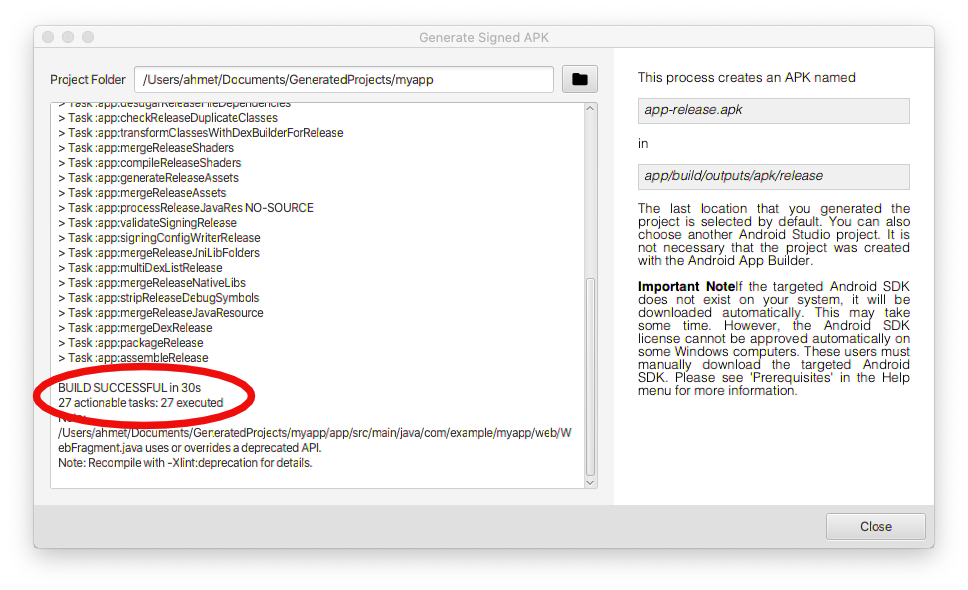
- When you are ready to publish, click to 'Generate Signed Apk' button then click to 'Start' button.
- If your build was successful, go to your project folder and follow this path 'app/build/outputs/apk/release'. You will find a file named 'app-release.apk'. You can upload this file to Play Store.
- If you want to save this project, click 'Save' on the 'File' menu. When you make a change to your project in the future, you will need to create an Android project again using 'Generate Project'.

If you receive an error message, please check the Prerequisites.
Uninstall - top
Mac OS XThere is no any uninstaller for MacOS. You can manually delete the 'AndroidAppBuilder.app' file from Applications folder. Additionally, go to your user folder '/User/USERNAME' then press Cmd+Shift+Dot to see hidden files. Delete the '.AndroidAppBuilder' folder. Press Cmd+Shift+Dot again if you do not want to see hidden files. (USERNAME is a placeholder.)
WindowsPlease go to the folder where Android App Builder is installed then run the 'uninstall.exe'. It will remove Android App Builder from your system but it will not delete your generated projects.
Once again, thank you so much for purchasing this product. As I said at the beginning, I'd be glad to help you if you have any questions relating to this product. No guarantees, but I'll do my best to assist. If you have a more general question relating to the items on CodeCanyon, you might consider visiting the forums and asking your question in the "Item Discussion" section.
Ahmet Zeki Eymür